

Quick Summary: This remote desktop connection error usually means one of four things: RDP is not enabled on the remote PC. Port 3389 is blocked.A Windows update affected an RDP service. Your RDP login credentials are incorrect.
Here, you will find the seven proven fixes in the correct order from basic checks to advanced registry troubleshooting. Follow each step with the instructions and screenshots to restore your Remote Desktop connection quickly.
You see the error “Remote Desktop can’t connect to the remote computer,” and it becomes annoying, especially when you need urgent access to your work PC, server, or cloud-hosted desktop.
This usually happens due to a few of the reasons like when the other computer is turned off or asleep, or when the computer name or IP address you entered is wrong or your internet or VPN is not working properly.
Network problems, inactive RDP services and closed port 3389 can also prevent access. You can usually fix the issues without any advanced technical knowledge.
Here we have given all seven proven fixes with labelled screenshots, so you can learn how to check your remote computer, verify its network, test port 3389, and solve common connection errors easily.
- What Does “Remote Desktop Can’t Connect” Actually Mean?
- First, Check These 30-Second Basics
- Fix 1: Enable Remote Desktop on the Server
- Fix 2: Allow RDP Through the Firewall
- Fix 3: Confirm Port 3389 Is Open and Listening
- Fix 4: Fix Your Credentials
- Fix 5: Change Your Network From Public to Private
- Fix 6: Connect by IP Address and Flush DNS
- Fix 7: The Advanced Fix — Add the RDGClientTransport Registry Key
- When It’s the Provider’s Problem, Not Yours
- Frequently Asked Questions
- Conclusion: How to Fix RDP Can’t Connect to the Remote Computer
What Does “Remote Desktop Can’t Connect” Actually Mean?
The error “Remote Desktop can’t connect to the remote computer” means your RDP client could not reach the remote PC or complete the login process. The problems usually come from one of these four root causes:
If the error appears immediately, then you need to check the network and port first. If the login screen appears but authentication fails, then you can check the credentials and account permissions.
First, Check These 30-Second Basics
Before changing Windows settings, confirm these simple points first.
If all of these checks pass but your RDP is still failing, then you need to test if TCP port 3389 or your provider’s custom RDP port is reachable before changing any firewall or Windows settings.
Fix 1: Enable Remote Desktop on the Server
Remote Desktop must be enabled on the computer you want to access. If it is disabled, the server will reject every RDP connection even when the IP address and password are correct.
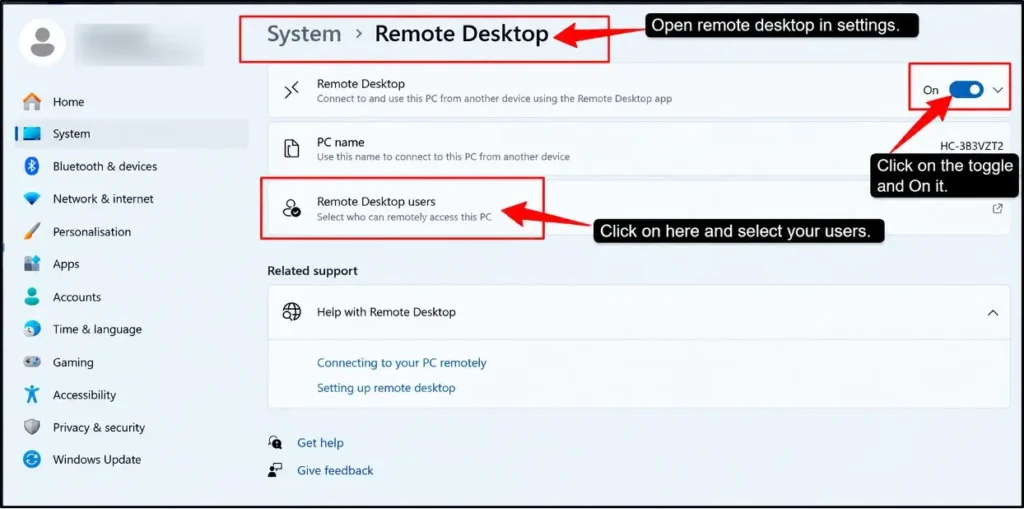
Method 1: Use your settings.
Method 2: Use the System Properties.
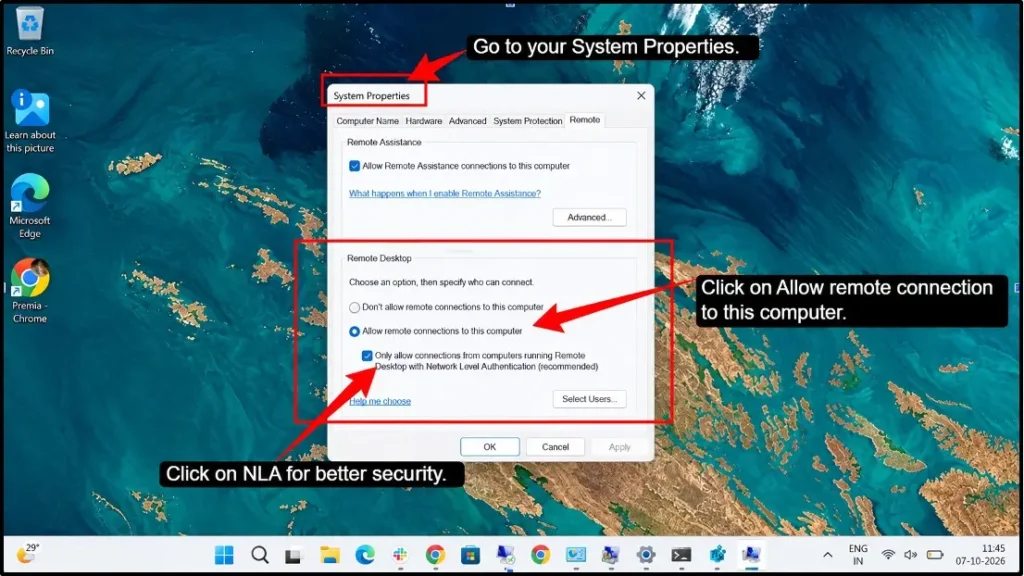
Check the Windows edition before troubleshooting further. Windows Home cannot host incoming RDP connections, as it can only act as an RDP client.
The remote server must run Windows Pro, Enterprise, Education, or Windows Server.
If the setting is missing or cannot be enabled, check if the Remote Desktop Service is running and if a company Group Policy is blocking remote connections. After enabling RDP, then try connecting again with the server’s correct IP address.
Fix 2: Allow RDP Through the Firewall
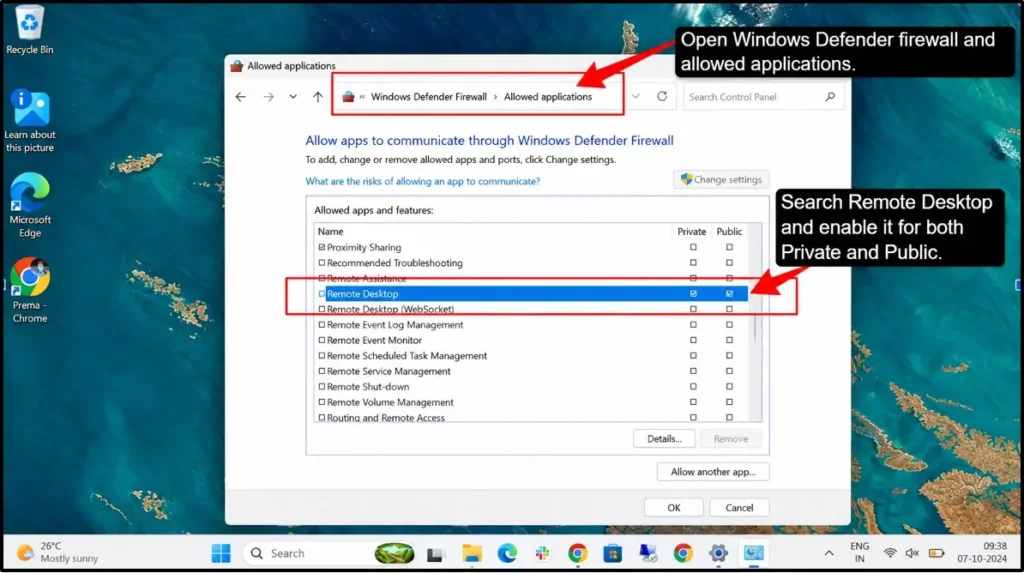
A firewall can easily block RDP even when the remote desktop is enabled. Windows normally uses TCP and UDP port 3389 for RDP traffic. Follow these steps to allow RDP through the firewall.
Allow RDP in Windows Firewall.
If you want to do a deeper check, then open wf.msc, select Inbound Rules >> Enable Remote Desktop – User Mode(TCP-In).
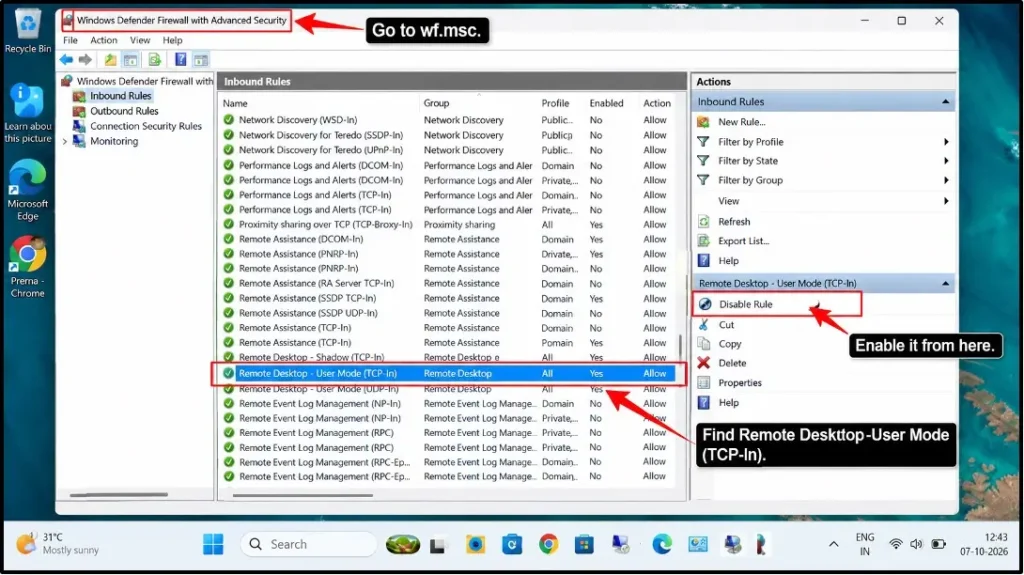
Also enable the UDP rule if your setup uses UDP transport. The rule must be enabled for the server’s active firewall profile.
Check the Router.
If your server is inside a home or office network, the router must forward the RDP port to the server’s local IP address.
Now, forward TCP 3389 to the correct computer, or you can use the custom port configured by your provider. A wrong port forwarding rule or changing the local IP can still block your connection.
Note: Do not expose RDP directly to the internet unless necessary. Prefer a VPN, private network, or provider firewall, and restrict access to trusted IP addresses.
Fix 3: Confirm Port 3389 Is Open and Listening
Remote desktop usually listens on TCP port 3389. You can test the port from the computer you are using for the connection, and not only from the server. Follow these steps to confirm that port 3389 is open and listening.
Run this command: Test-NetConnection – ComputerName SERVER – IP – Port 3389Test-NetConnection – ComputerName SERVER – IP – Port 3389 – Information Level Detailed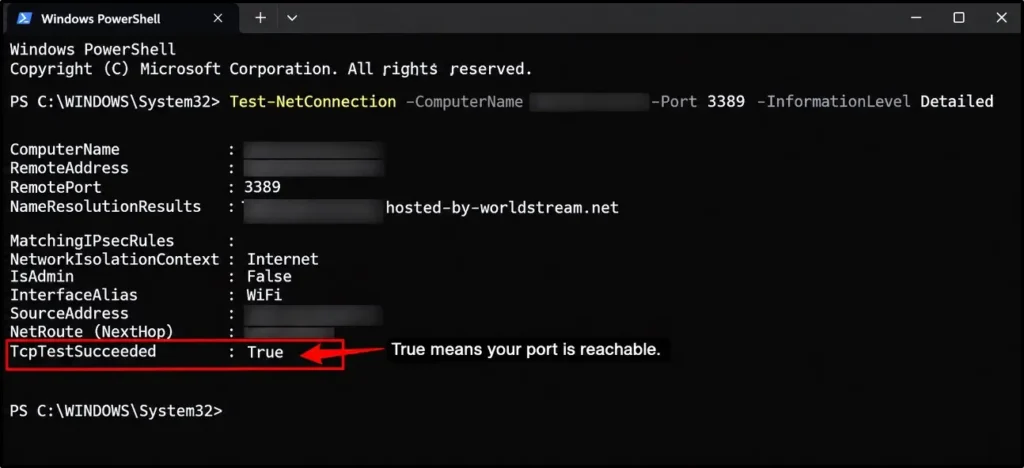
Now check the result:
If you have console access to the server, then verify that something is listening on port 3389. If no listener appears, then you can check the Remote Desktop Services and firewall rules. Also confirm that the RDP port was not changed.
Fix 4: Fix Your Credentials
If RDP reaches your login screen but rejects you, then in this case the problem may be the username format, saved password, or account permissions.
Use the Correct Username Format (.\username or Administrator)
RDP may even reject valid credentials if Windows cannot identify which account you mean. Always enter the username based on the account type, like:
Local account: .\username.Local administrator: .\Administrator. Computer-specific format: COMPUTERNAME\username. Domain account: DOMAIN\username. Microsoft account: Here, use the full Microsoft account email address. The prefix .\ tells Windows to authenticate against the remote computer’s local accounts instead of a domain. Also, use the account’s actual password, and not the Windows PIN, fingerprint, or face-login method.
If the administrator is disabled or renamed, then you can use another enabled account that belongs to the Remote Desktop Users group.
Clear Old Saved Credentials in Credential Manager
Windows may be automatically using an outdated password. You can change this by following these simple steps:
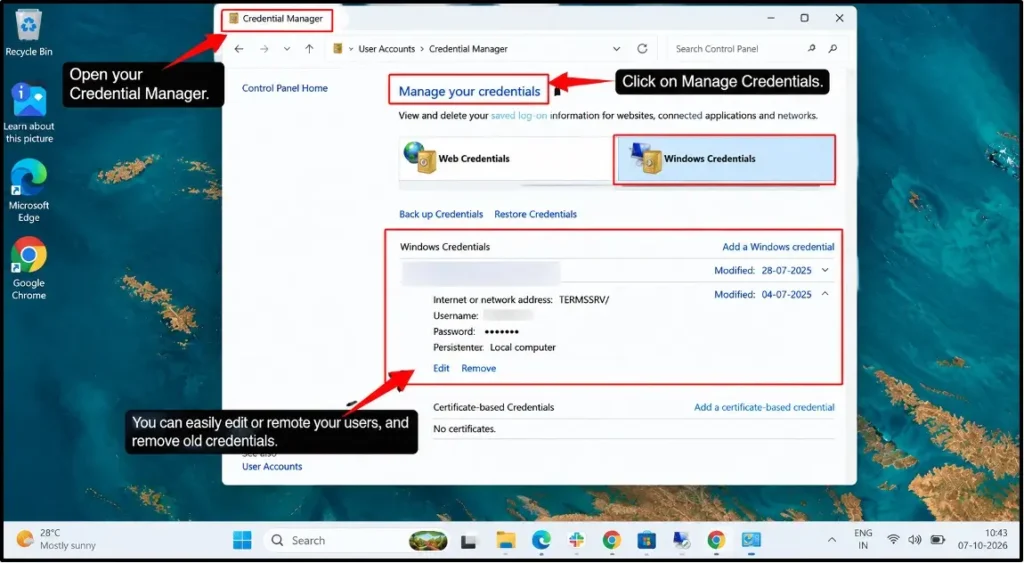
Microsoft identifies Credential Manager as the place where saved RDP credentials can be edited or removed.
Add the User to the Remote Desktop Users Group
The account must have permission to sign in through RDP:
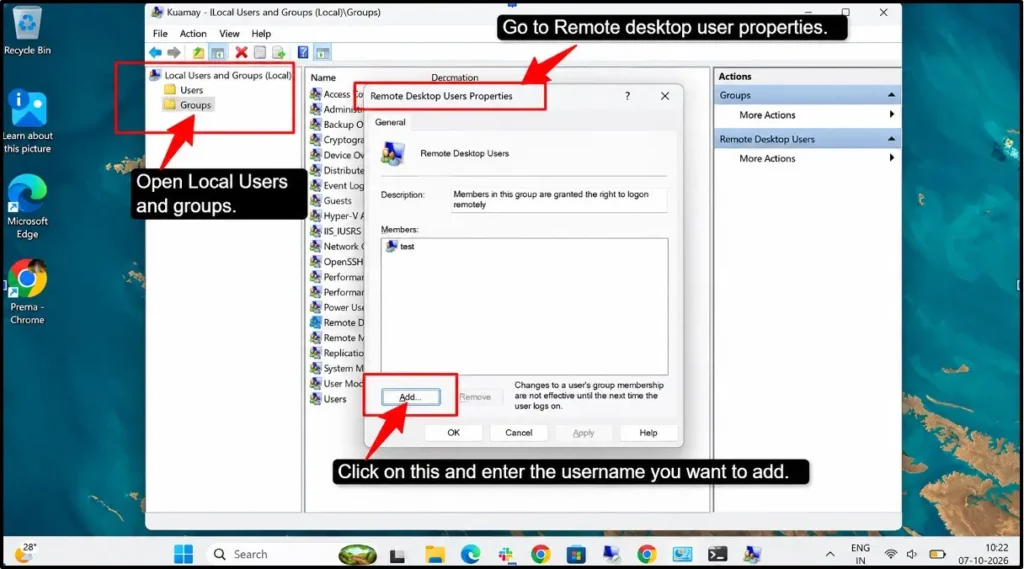
Try connecting again. Replace the username with the actual account name. Also ensure that a local or domain policy has not removed the Allow log on through Remote Desktop Services permission.
If you are using the correct username format, you can easily resolve many RDP authentication errors. Follow all these steps properly as given above, and if the login still fails, then remove your old saved credentials from Credential Manager and try again.
Fix 5: Change Your Network From Public to Private
Windows applies different firewall rules to Public, Private, and domain networks. After an update or network change, Windows may classify a trusted server network as Public, where inbound RDP traffic is more restricted.
Change it through settings.

Change it with PowerShell:
Open PowerShell as administrator and check the current profile:
| Get-NetConnectionProfile. |
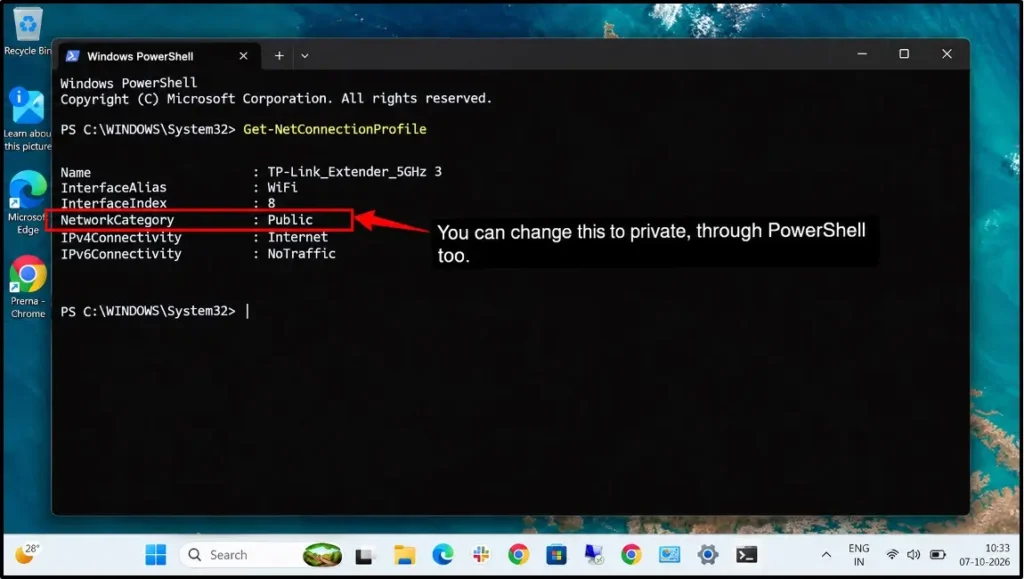
If NetworkCategory shows Public, change it to Private by running this command.
Get-NetConnectionProfile –InterfaceIndex YOUR_INDEX_NUMBER –NetworkCategory Private. Write your actual InterfaceIndex number shown on your server. For your domain-connected server, use DomainAuthenticated instead of Private.
After changing your profile, confirm that the RDP firewall is enabled for that profile. Only choose Private when the network is trusted, such as your home, office, or private VPS network; do not use public Wi-Fi.
Fix 6: Connect by IP Address and Flush DNS
If your hostname points to an old or incorrect address, RDP may connect to the wrong computer or fail to find the server.
Microsoft recommends trying the remote computer’s IP address when name resolution causes connection problems.
If the IP address works but the hostname does not, you should clear the DNS cache by following these steps:
ipconfig /flushdns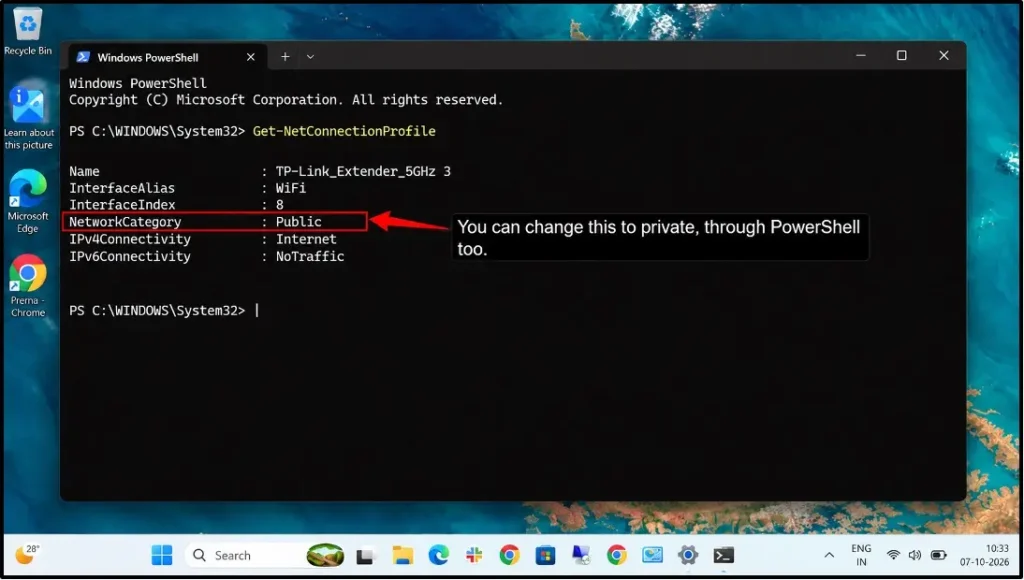
The /flushdns command basically clears the outdated DNS entries from the local resolver cache. If the problem continues, verify the hostname’s current address with:
nslookup server-name. It is important to confirm that you are using the current public IP address if you have cloud or VPS access because it may change after a restart or migration.
Fix 7: The Advanced Fix — Add the RDGClientTransport Registry Key
This advanced fix helps when RDP works normally but fails through a remote desktop gateway or a network that blocks the default transport.
The setting forces the client to use RPC over HTTP instead of the newer HTTP/ UDP transport.
Add the Registry Value by following these steps:
HKEY_CURRENT_USER\Software\Microsoft\Terminal Server Client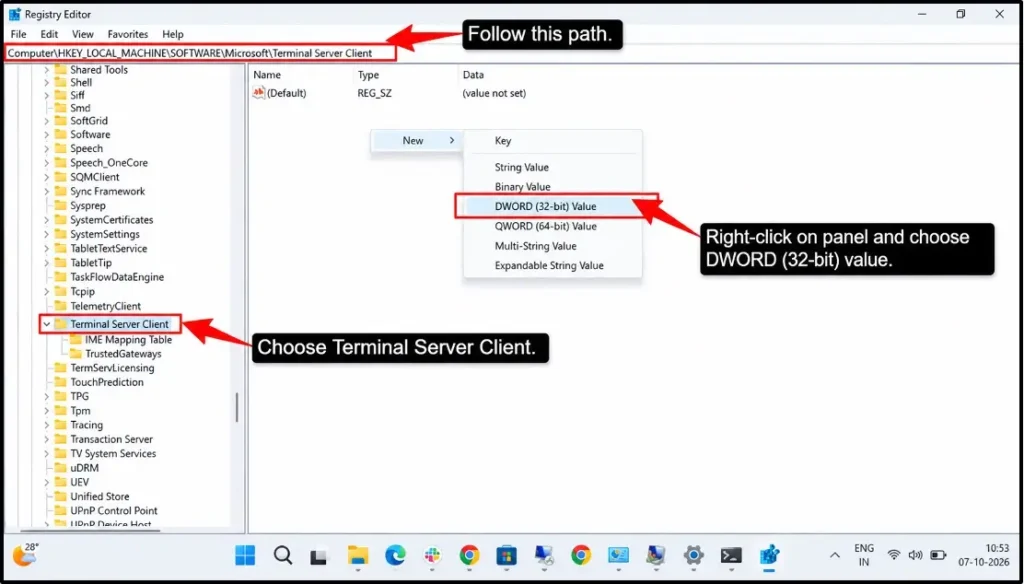
RDGClientTransport. 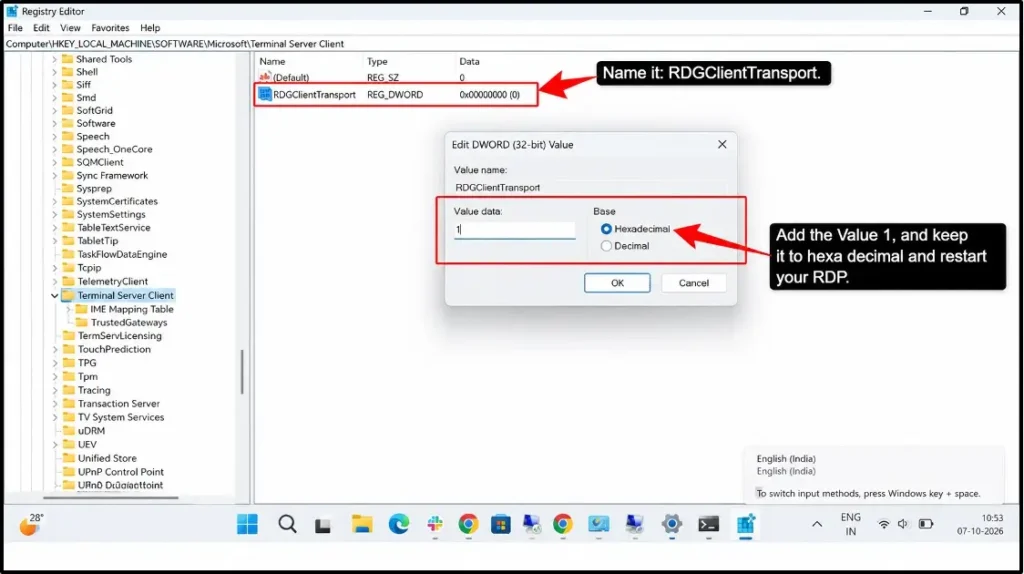
This setting applies to the current Windows user because it is stored under HKEY_CURRENT_USER. It mainly helps connections using an RD Gateway; it will not fix a disabled RDP service, a blocked port 3389, incorrect credentials, or an offline server.
If you want to undo this change, then return to the same registry path and either set RDGClientTransport to 0 or delete the value.
Back up the registry before editing it, because an incorrect change can easily affect Windows or your RDP behaviour.
When It’s the Provider’s Problem, Not Yours
If you still cannot reach the server after checking RDP, the firewall port, credentials, and DNS, then the issue may be on the provider’s side.
The server could be powered off, suspended, or incorrectly configured at the VPS or cloud-network level.
Check your provider’s control panel for:
Note: Avoid repeatedly changing registry or firewall settings when the server itself is unavailable.
Ask your provider to verify the VM status, RDP service network route, public IP, and firewall configuration.
If your provider console also shows the server as offline, or you cannot reach its IP and TCP port, contact support with the server ID, IP address, error message, and the time the problem started.
Frequently Asked Questions
Why does my Remote Desktop say it can’t connect?
- Confirm that your server/PC is on and the IP or hostname is correct.
Make sure RDP is enabled: Settings >> System >> Remote Desktop >> On.
Check that the firewall, router, or cloud security group allows TCP port 3389.
How do I know if port 3389 is blocked?
You can run the PowerShell command: Test-NetConnection <server-IP> -Port 3389. Run this command, and if the TcpTest shows False, then it means that your port is closed, blocked, or unreachable.
Why did RDP stop working after a Windows update?
- Your Windows updates can reset settings, so you can check:
Remote Desktop is still enabled.
The “Remote Desktop Services” service is running services.msc).
If nothing works, then uninstall the latest update (Settings >> Windows Update >> Update history >> Uninstall updates).
Can I use RDP on Windows 10/11 Home?
Yes, you can use RDP on Windows 10/11 Home to connect outward to another computer, but you cannot host incoming connections.
How do I fix “your credentials did not work”?
Just use your credentials in the right format: .\username (local), DOMAIN\username, or MicrosoftAccount\email. Add your users to the Remote Desktop Users group and make sure the account has a password.
What if none of the fixes work?
If nothing works, then restart your server and your local PC. Check your provider console, and if the server shows offline, then restart it from there. Contact the support team with the server ID, IP address, exact error message, and the time the problem occurred.
Conclusion: How to Fix RDP Can’t Connect to the Remote Computer
This remote desktop connection issue is usually caused by a disabled RDP service, a blocked firewall, or entering the credentials in the wrong format. It can also be due to DNS problems or a server-side issue.
You can just start with the basic checks, and then you can easily verify firewall rules, port 3389, and network profile.
Every fix that is mentioned above will help you to have a smooth RDP experience, but if none of these issues work and your server remains unreachable, then you can use your provider’s console and you can get in touch with their support team to understand the real cause.
💡 Most Loved Article!




Leave a comment