

Quick Summary: Choose a cloud plan that fits your business to set up Tally on the cloud. Create your account and upload your old data to the cloud. Set up your login and security settings. Connect your printer if needed. The whole process of setting up Tally on the cloud takes 15-30 minutes, and you can start working right away from laptops, tablets, or iPhones anywhere.
Are you managing your business accounting manually and need a better way to organize it?
Switch to Tally; it’s one of the most popular accounting software used by businesses everywhere. Setting up Tally on the cloud makes your business accounting accessible from anywhere, anytime.
You don’t need to install software on your computer or worry about your data backup; everything is stored safely on a remote server, which you access using RDP login credentials, even on your phone, and update your accounting anytime.
Cloud-based Tally keeps your financial records secure. Multiple authorized users can access Tally according to the selected cloud plan and the applicable Tally licensing requirements. You can easily track expenses and handle accounts.
This article will help you move your accounting to Tally on Cloud in simple steps. Here, you’ll have a complete understanding of how to set up and start using Tally on the cloud platform with confidence.
What You Need Before Setting Up Tally on Cloud
Before you start a Tally on the cloud setup, make sure you have the following things ready. This will prevent activation issues, slow performance, or access problems later. Here is the list you need to check:
Valid Tally license and credentials
Cloud infrastructure or hosting plan.
You must have a place to run Tally on the cloud. You can choose:
Internet connection and devices.
Always remember: TallyPrime runs on Windows. So, you cannot install and run it directly on a Mac. To use Tally on a Mac, you can connect to a Windows remote server using RDP and then run Tally in the Windows environment.
Can I use my existing Tally license on the cloud?
Tally data and backup
Access and Security Details
Now when you have everything in place, you’re all set to begin your Tally Cloud journey. Even if you’re new to cloud-based accounting, Tally on cloud is very easy and simple to use.
In the next section, we’ll tell you the step-by-step process of creating your account and setting up Tally on the cloud with properly labeled screenshots.
How to Set Up Tally on Cloud (Quick Overview)
Let’s set up Tally on the cloud from scratch; the very first step is to choose and order a Windows-cloud-based server that will host TallyPrime, and then you can connect to it through a remote desktop.
Before ordering a server, you need to decide how many people will use Tally on the cloud simultaneously. You need to decide if you require the TallyPrime Silver plan for a single user or the Gold plan for multi-user licensing.
Note: We have used QloudRDP for our own Tally on-cloud setup because it’s our company, so we have given exact steps with properly labelled screenshots. But if you have a different provider or you want to choose another, you can choose, but maybe the steps can differ.
Decide Your Number of Users
This guide is for single users who want to access TallyPrime from a cloud server through remote desktop. Choose a single-user cloud setup if only one person will open and work in TallyPrime at a time. In this case, you need:
If two or more employees need to work in TallyPrime at the same time, choose a multi-user cloud plan and a TallyPrime Gold license. Gold is designed for multiple users working together on the same server.
Bring Your Own License or Buy One
You can set up TallyPrime on the cloud server in either of these ways:
Note: To use TallyPrime through QloudRDP, you need a TSplus license for remote access. TSplus Silver License: Allows 1 concurrent RDP session/remote access to the server. TSplus Gold License: Allows 10 concurrent RDP sessions/ remote access to the server.
A Silver license can be active on only one machine at a time. Therefore, after you reactivate it on the cloud server, it will no longer be active on the previous computer.
You can also buy a new license if you don’t have an existing one or you’re new to TallyPrime. You can purchase a valid Tally license from any authorized Tally partner.
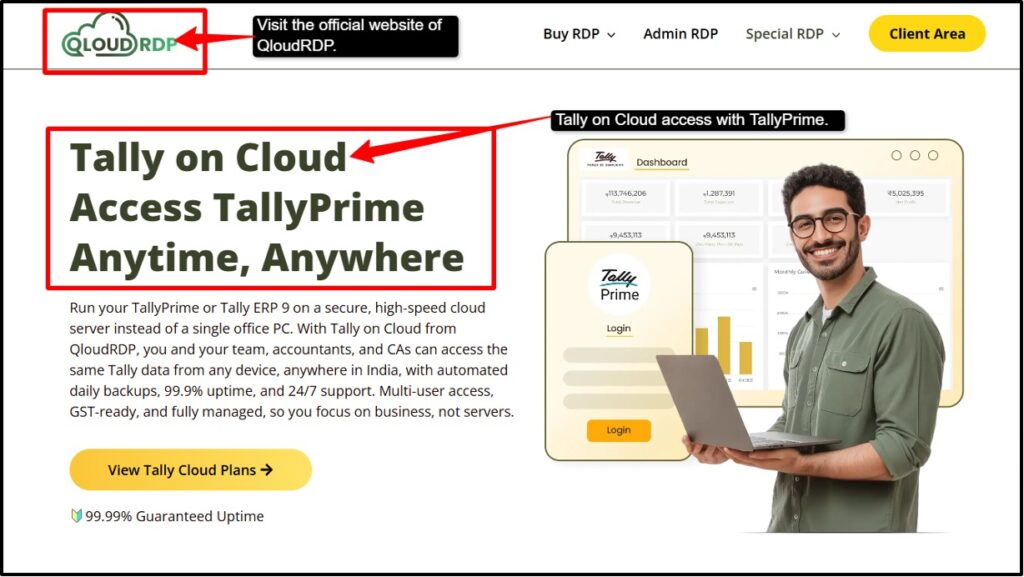
Once you visit the official website of QloudRDP >> Purchase their Windows VPS managed cloud server >> complete the checkout >> After payment, the provider will email you with the login credentials.
You will receive in your email:
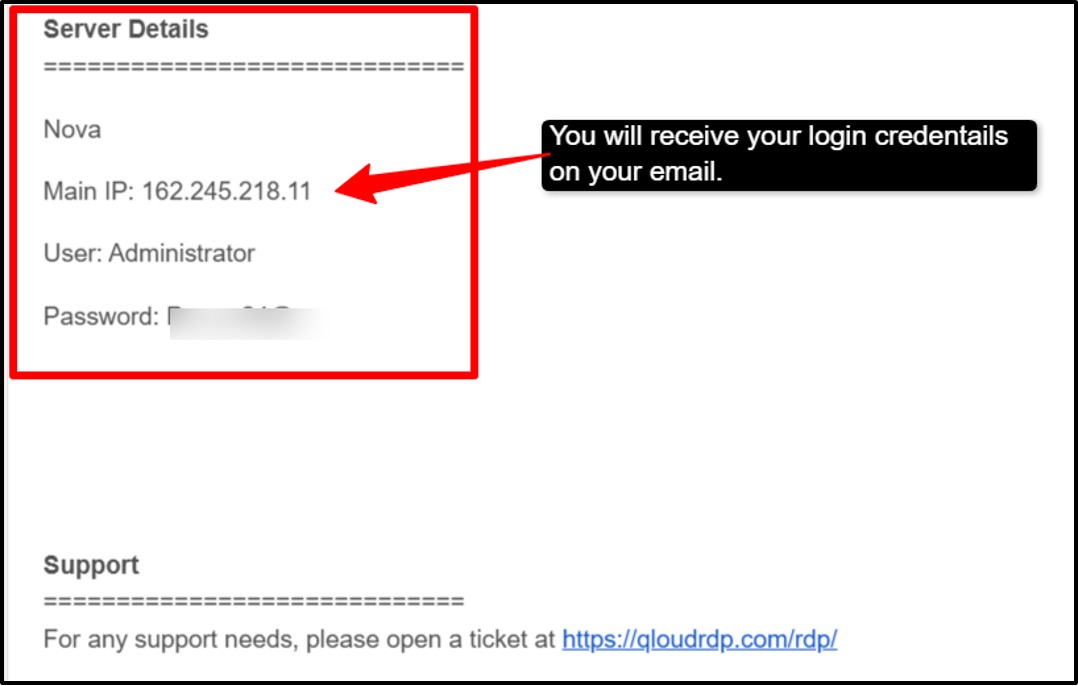
Keep these details safe with you, as you’ll need them to connect.
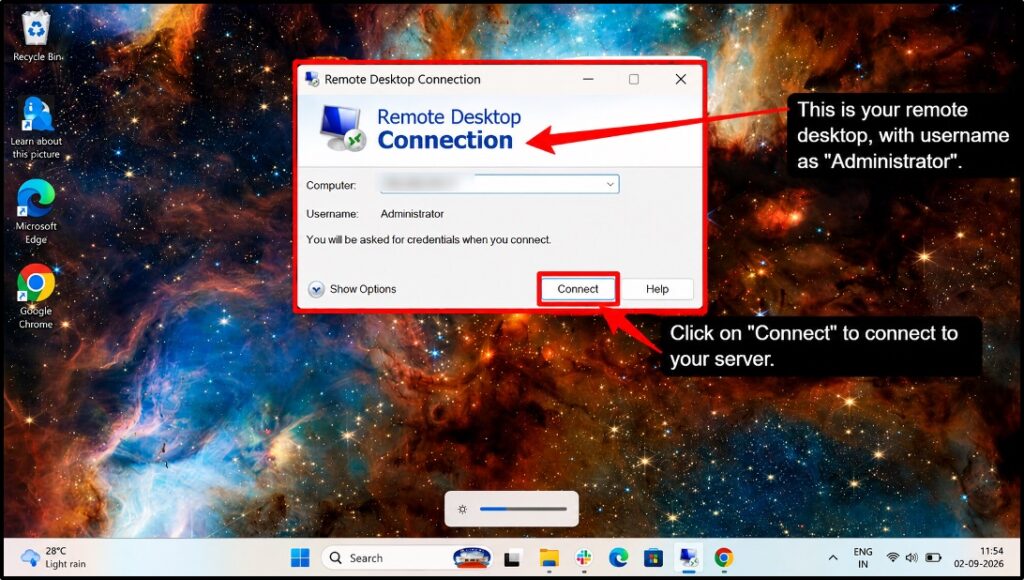
Once you receive the login credentials in your email, use them to connect to your cloud server. You need to connect to it from your local computer using Remote Desktop Protocol (RDP).
This gives you full control of the cloud server just like your own PC, and all Tally operations will happen inside this remote session.
From Windows
On your local PC:
From Mac.
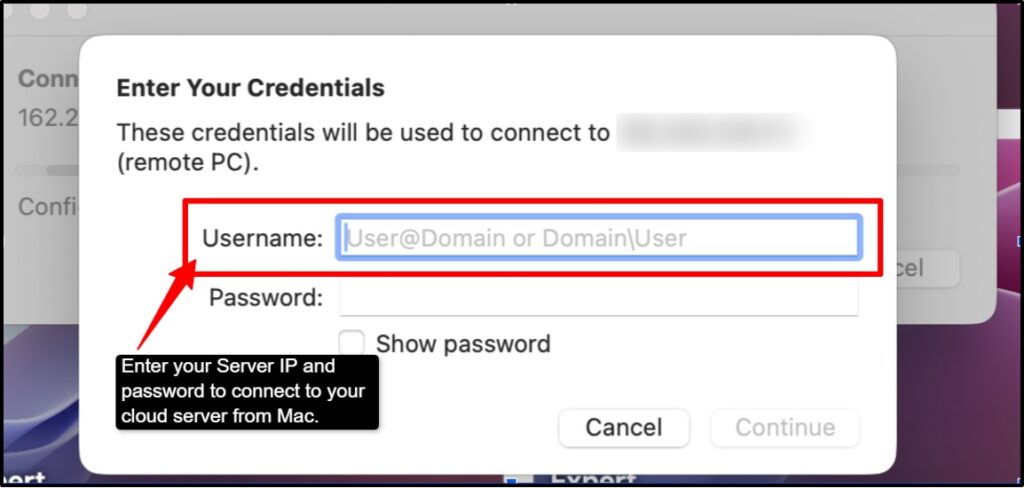
Just by following these steps, your Tally on Cloud setup on a cloud server is complete and ready for daily use. As a single user, you can now easily access your account securely from any device with an internet connection.
Note: If you’re facing compatibility issues with desktop Tally on your Mac, Tally on Cloud is a better solution. It’s optimized for Mac and removes the technical problems that desktop versions face.
All your data stays on the cloud server, reducing the risk of local hardware failures. If you ever need to add more users later, the same server can be upgraded to a multi-user Tally setup with minimal changes.
After you connect to your cloud server through RDP, the next step is to install Tally on the cloud server and then activate or load your license.
Fresh Installation
You have to do a fresh installation if you have never used Tally. Download the latest version.
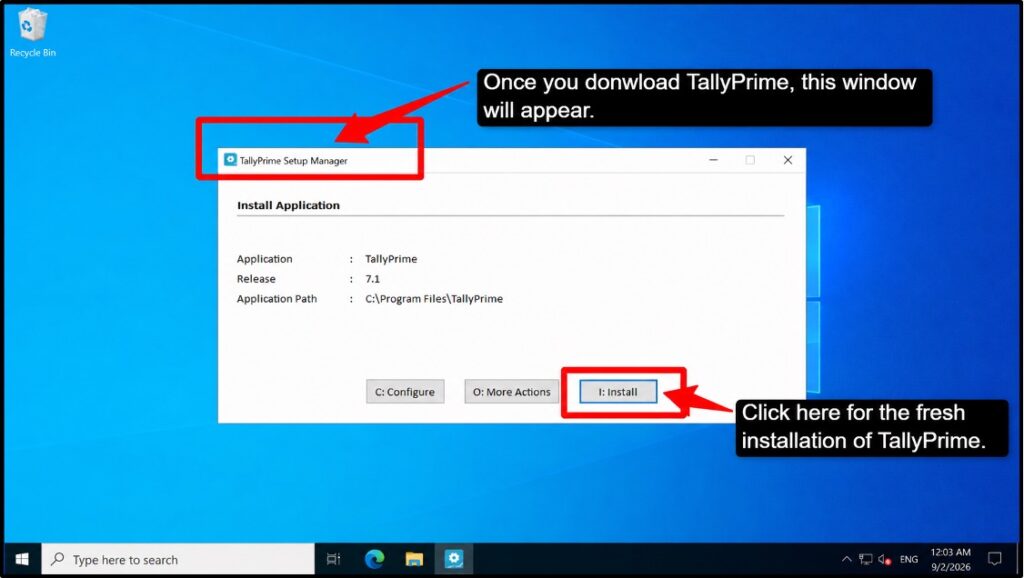
Launch Tally once installation is finished. This gives you a clean, fresh Tally installation on your cloud server.
Enjoy your accounting needs with a smooth experience now.
Activate or Load Your Existing License
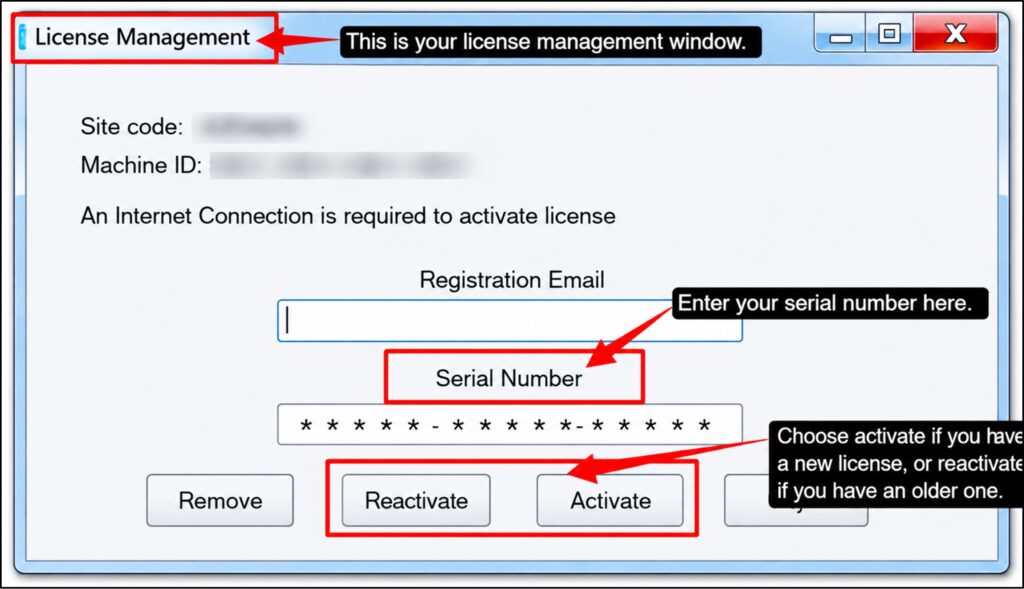
Complete the activation over the internet from the server. If you already have an active license on another machine, you can either:
Once activated, your Tally instance on the cloud server is fully licensed and ready for company data setup or migration.
If you already have Tally data on your local PC or another server, you can move it to your new cloud server so that all your companies’ transactions are available in the cloud setup.
This is done by copying your Tally data folder from your local machine to the cloud VPS and then opening those companies in Tally on the server.
Once migrated, your full accounting history and reports will be available in the cloud setup, and you can continue working exactly as before, but from anywhere.
Even though your data now lives on a cloud server, you should still set up regular backups to protect against accidental changes, corruption, or rare server issues.
You can use Tally’s built-in backup feature to schedule automatic backups on the server and also enable your VPS provider’s snapshot or backup service to take periodic copies of the entire server.
Together, these layers of backups ensure that you can quickly restore your Tally data and continue working with minimal disruption if anything goes wrong.
Once your Tally data is in one cloud and backups are enabled, the next step is to secure the setup so that only you (and any trusted users you allow) can access Tally on the cloud.
Security measures include:
All of these steps are completed and explained easily. Your single-user Tally in the cloud environment is fully set up now, and it’s backed up and secured at the same time.
Common Setup Problems (and How to Fix Them)
If you’re setting up Tally for the first time, it can sometimes feel a little confusing, and you might face a few of the issues that come with the way it’s set up.
But don’t worry, we’ll help you here too.
It is completely normal; most users face one or more setup issues, but almost all of these problems have simple solutions.
We have listed some of the common setup problems and offer you steps to fix them quickly.
Can’t Connect to the Cloud Server
It means you see error messages like “Connection failed,” “Server Not Responding,” or “Unable to connect to the Internet.”
Causes:
How to fix it:
Tally License Not Activating
This means you enter your license key but get an error message saying, “License invalid,” “Activation invalid,” or “License expired.”
Causes:
How to fix it:
Printer Not Showing in Cloud Session
This means you can print from your computer normally, but Tally Cloud does not recognize your printer. You see an error like “No Printers Available” when you’re trying to print.
Causes:
How to fix it:
Data Not Syncing for Multiple Users
It means changes made by one user don’t appear for other users. For example, a new invoice entered by you does not show up when your accountant logs in.
Causes:
How to fix it:
Pro Tip: Most setup problems are solved by simply refreshing your browser or checking your internet connection. If none of these solutions work, reach out to your Tally Cloud customer support.
Do You Have to Set Up a Tally on Your Own Cloud?
No, you don’t have to, because Tally on Cloud configuration steps can be set up using managed setup services where the server and the infrastructure are prepared for you.
Managed setup is simple: instead of doing all the steps, you pay a professional to install and set up Tally Cloud for your business. They do everything, creating your account and putting your old data into the new system.
Some providers specialize in setting up Tally Cloud; for example, QloudRDP is a provider that helps set up Tally Cloud for you from start to finish.
They do everything from setup to providing the infrastructure, while the Tally license is a separate part you need to purchase from somewhere or bring your existing one. You pay an affordable one-time fee, and they take care of everything.
Frequently Asked Questions (FAQ)
How long does it take to set up Tally on the cloud?
It takes 15-30 minutes if you do it yourself. You just need to create an account, enter your company details, and then you’re ready to use it.
Can I move my existing Tally data to the cloud?
Yes, you can migrate your existing Tally data to the cloud. You can either do it yourself, or you can hire a professional to do it. Your data will be safe and accessible in the cloud.
Do I need technical skills to set up Tally on the cloud?
No, Tally Cloud is made for everyone. You don’t need to know anything about companies or technology. The setup is simple, and anyone can do it by following the basic steps.
Can I use my existing Tally license on the cloud?
Yes, you can use your valid existing Tally license on the QloudRDP cloud server. But multi-user access requires an applicable multi-user Tally license.
How do I connect Tally On Cloud from a Mac?
Mac users first need to install an RDP-compatible remote desktop app. After that, they can use the login details provided by QloudRDP to connect to the Windows cloud server and access Tally on the cloud.
Will my TDLs and customizations work on the cloud?
Yes, most of the TDLs and customizations work on the cloud version. Although some complex customizations might need adjustments. Tally Cloud supports most of the features, but it is best to check with Tally support about your specific customization before migrating.
Conclusion: Get Your Tally Running on the Cloud Today
Your Tally setup on the cloud is simple and fast.
If you have a small business or you’re an accountant, you can easily start using it in just a few minutes. You don’t need any technical skills for this, just an internet connection and an email.
If you have existing Tally data, you can move it to the cloud very easily. Cloud-based Tally gives you access to your accounts any time, from anywhere, on any device. You can work from your office, home, and even while travelling.
Your data is always safe and backed up automatically. Plus, you can share access with your team members and accountants instantly.
Switch to Tally Cloud today and make your accounting work easier and faster.
💡 Most Loved Article!









2 Comments