

Quick Summary: This guide shows you how to set up Remote Desktop (RDP) on your Windows VPS so you can control it from anywhere like it’s sitting on your desk and the three simple methods of enabling RDP on your Windows VPS.
Out of the three methods for enabling RDP, System Properties is one of the easiest and quickest methods you can try. Go to your PC >> Then Properties >> Click on Advanced System Settings >> Click on Allow Remote Connections to This Computer >> Click ok Allow RDP through the firewall >> Connect remotely.
Do you need your Windows VPS to work 24/7 without any hassle?
You already know what RDP is. You want it working on your Windows VPS so you can log in anytime from anywhere. Simple, right? But the issue arises: you’re not sure exactly how to set it up, or maybe you tried and got stuck somewhere.
Don’t worry, we’re here for you.
This guide solves your problem in minutes. We have shown here step-by-step how you can enable RDP on a Windows VPS and keep it running all day, every day.
There are no confusing instructions, and no technical expertise is required. Just clear, labelled screenshots with simple steps showing you exactly what to click.
We have given three easy methods. You can pick whichever one feels comfortable, use the settings, or use the commands. All work great. By the end, your remote desktop will be live, secure, and ready to go.
Let’s make it easy for you.
What You Need Before Enabling RDP?
Before you know how to enable RDP on your Windows VPS, gather a few of the important things. If you have everything ready, it just takes 5 minutes, and you can easily prevent problems later.
- Admin Access
- You must be an administrator access on your VPS.
- Get the right connection tool; Windows users already have it. Mac users download Microsoft Remote Desktop.
2. Open Port 3389
- RDP uses TCP port 3389 by default for incoming traffic.
- Check your hosting provider’s firewall; log into your hosting dashboard and check security or firewall settings. Your hosting provider must open port 3389 in their firewall.
- Check your cloud firewall; if you’re using a cloud provider, you must allow port 3389 in their security groups or firewall rules.
- Check Windows Defender Firewall inside the VPS; even if your provider opens the port, Windows Firewall on your VPS can still block it. You need to open port 3389 inside Windows Firewall too.
3. Your Server Needs
- You should have Windows Server 2016, 2019, or 2022, or the latest version.
- You should have at least 2-4 GB of free memory and a stable internet connection.
- RDP feature (already built into Windows).
Note
2 GB works fine, but it can feel tight at times with heavy workloads, so 4 GB and above is always better for a smoother experience.
4. Security Preparation
- Create a strong password (12+ characters with uppercase, lowercase, numbers & symbols)
- Write down who needs RDP access by their username.
- You also need your Windows VPS IP address, username, and password, as without it you cannot establish your connection.
- You should even consider using a VPN for extra security.
- Enable brute force protection by limiting your login attempts to 5 tries, then lock the account for some time to stop hackers from guessing your password.
5. Network Level Authentication (NLA)
- NLA adds extra security to your RDP connection by preventing unauthorized login attempts before your connection.
- Your client computer (the one connecting) must support NLA.
- Most modern Windows versions support it, Mac and Linux clients also have NLA support.
This is all you need to prepare. Once you have these items ready, you are completely set to enable RDP safely and get connected to your Windows VPS.
How to Enable RDP on a Windows VPS?
Now it’s time to actually run RDP on your Windows VPS. But don’t worry, this isn’t complicated at all. We’ve got three different ways to do this, so you can pick whichever feels easiest to you.
If you prefer clicking through menus or using commands, one of these methods will work perfectly.
Let’s start with each one and have you connected to your server in minutes.
Method 1: Enable RDP Through System Properties
This is the simplest method if you’re new to Windows or if you prefer using the graphical interface. You’ll use the System Properties window to turn on your Remote Desktop.
We’ve given simple and navigable steps in all of the methods so you can try them today.
Step 1 – Open System Properties
- Right-click on “This PC” >> or “My Computer” on your desktop.
- Select “Properties” from the menu.
- Click on “Remote Settings” on the left side (you may need to scroll down to find it).
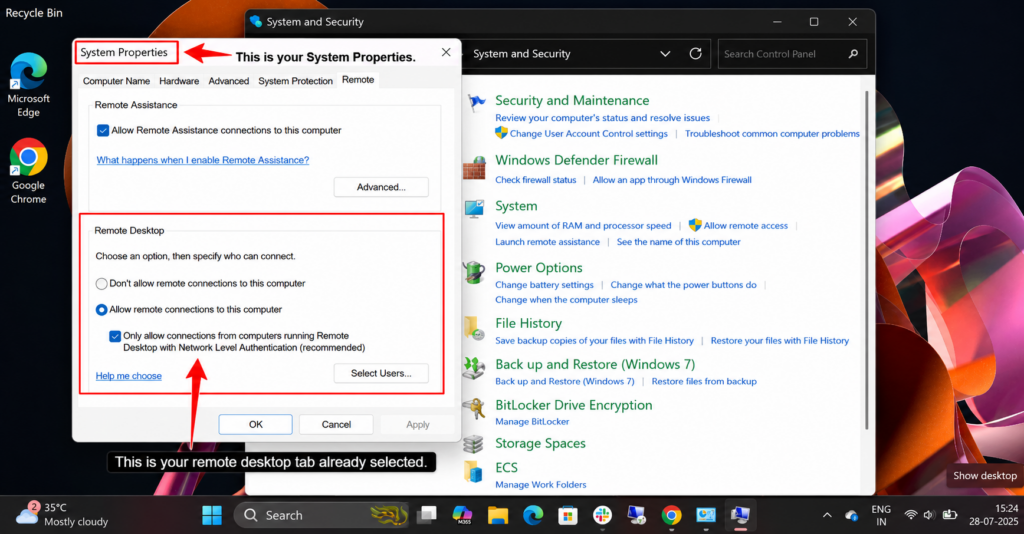
- This opens your System Properties window with the “Remote” tab already selected.
Step 2 – Turn On Remote Desktop
- Now look for the section labelled “Remote Desktop.”
- Check the box next to “Allow remote connections to this computer.”
- A dialogue box will appear asking to confirm >> Click OK.
- Windows will automatically enable the remote desktop service.
Step 3 – Allow RDP Through the Firewall
- Open Windows Firewall (search “Windows Defender Firewall” in the Start menu).
- Click “Allow an app through the firewall.”
- Look for “Remote Desktop” in the list.
- Make sure it’s checked for both “private” and “public” networks.
- Click Ok to save.
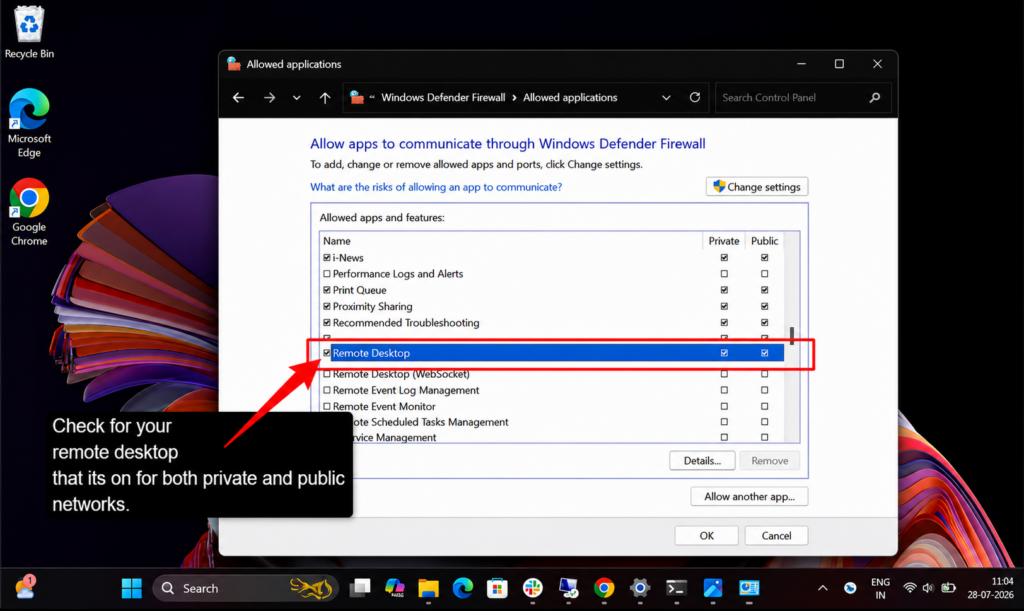
Once you access your system settings and enable Remote Desktop, Windows will activate the necessary services to accept incoming connections.
Method 2: Enable RDP Using Windows Settings
This method uses the modern Windows settings app and works well on Windows Server 2016 and newer. It is very quick and straightforward to understand.
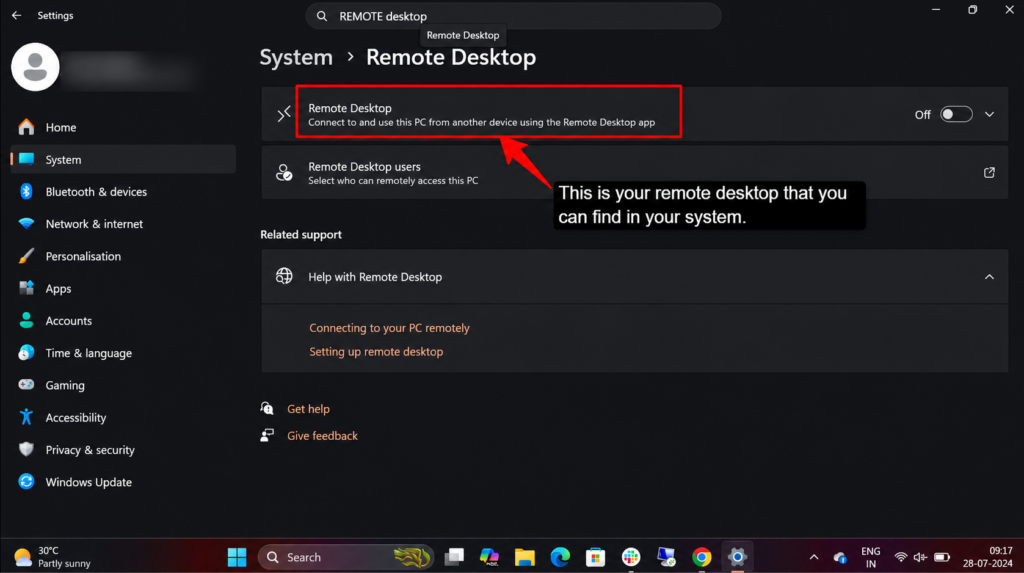
Step 1 – Go to Settings › System › Remote Desktop
- Press Windows key + I to open your settings.
- Click on “System” from the menu.
- Now, scroll down on the left sidebar and select “Remote Desktop.”
Step 2 – Toggle Remote Desktop On
- You will now see a toggle switch at the top that says “Enable Remote Desktop.”
- Click it to turn it on.
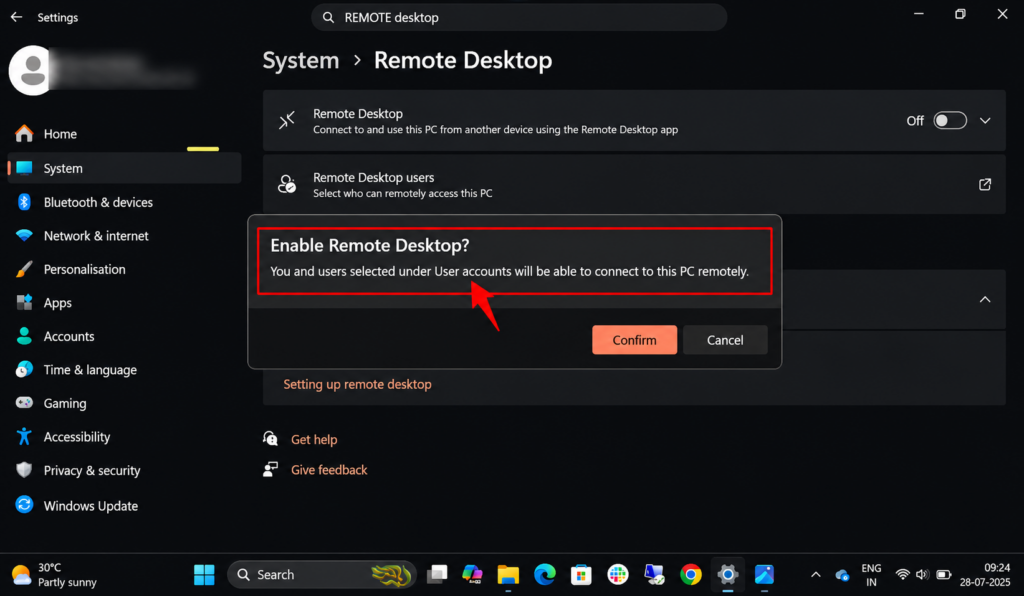
- A dialogue will pop up asking you to confirm, so click Confirm.
- Windows will enable the Remote Desktop service automatically.
Note
You also get an option to add your users; select this, because after this only you can connect.
Step 3 – Confirm & Note Your PC Name/IP
- Still in the Remote Desktop settings page >> Scroll down to find “How to connect to this PC.”
- You will find your computer name listed (something like SERVER-12345 or WIN-ABC123)
- Note this down, as you will need it when connecting from your local computer.
- Alternatively, you can use your VPS IP address instead of the computer name.
After you enable your remote server through Windows settings, your VPS is configured to accept all of your connections. After this, your remote server setup is complete and now ready to use.
Method 3: Enable RDP via PowerShell (For Advanced Users)
This method uses command-line tools for users comfortable with technical operations. This method is perfect if you’re an advanced user and also for those who are familiar with command-line interfaces, automation, and remote administration.
Here’s the complete breakdown for you, in easy steps.
1. Enable RDP with a Registry Command
PowerShell can modify the Windows Registry to enable remote desktop on Windows Server 2022.
Command:
Set-ItemProperty -Path 'HKLM:\System\CurrentControlSet\Control\Terminal Server' -name "fDenyTSConnections" -value 0; Enable-NetFirewallRule -DisplayGroup "Remote Desktop"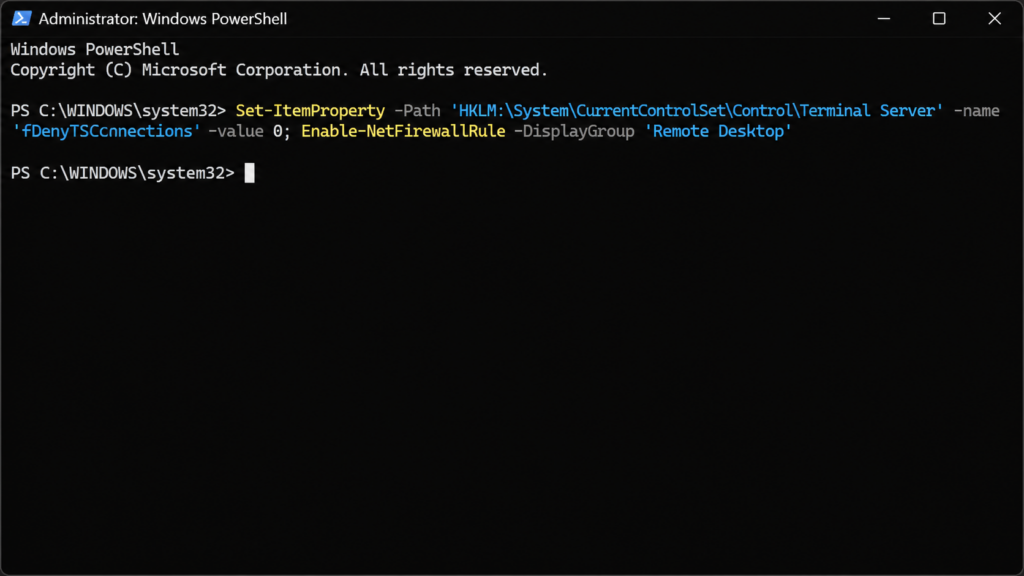
Note
You can even verify using a command to check that your RDP has been enabled or not. Check with the command given below.
Command to verify:
Get-ItemProperty -Path 'HKLM:\System\CurrentControlSet\Control\Terminal Server' -name "fDenyTSConnections" 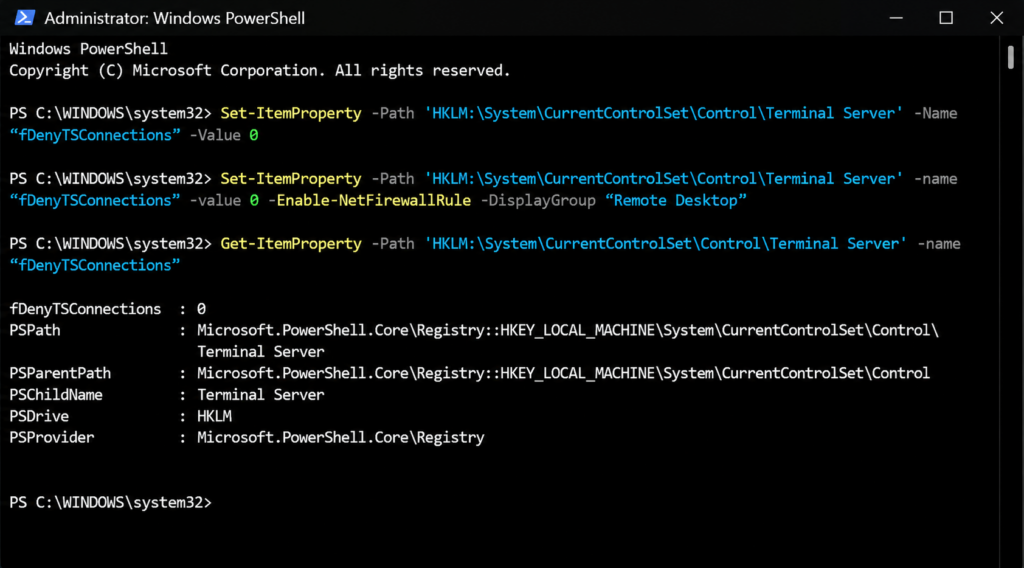
When your RDP is enabled via PowerShell, once you run the verifying command, it will show like this.
2. Open the Firewall Port via PowerShell
Add your RDP to the Windows Firewall in simple steps.
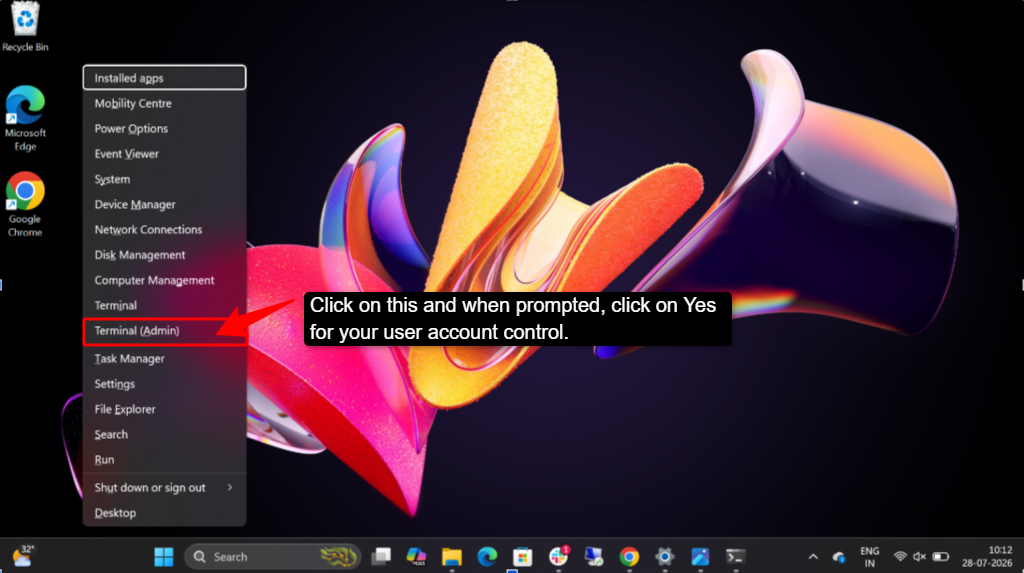
- Step 1: Open PowerShell as administrator.
- Press the Windows key + X.
- Select “Windows PowerShell (Admin)” or “Terminal (Admin).
- Click on “Yes” when prompted for user account control.
- Step 2: Run the Firewall Command
Command:
Enable-NetFirewallRule -DisplayGroup “Remote Desktop”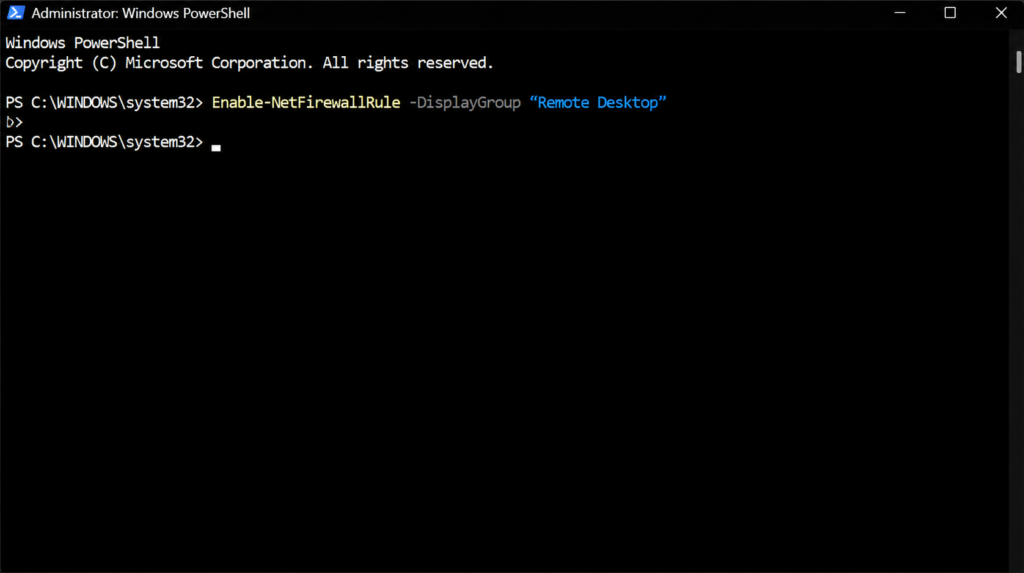
This command automatically enables all firewall rules associated with your remote desktop.
- Step 3: Verify the port is open (Optional)
You should see output showing Port 3389 and Protocol TCP. Now click Confirm. If rules appear in the output, RDP is accessible through the firewall.
Congratulations, your Windows VPS is now fully configured for your remote desktop access.
You can choose any one of these 3 steps that I talked about above from the graphical system properties method, the settings app, or the advanced PowerShell approach; your RDP is enabled, and the firewall is in place.
Simply be ready with your VPS IP address or computer name, open RDP, and you’ll be managing your server remotely in seconds.
Note
Remember to keep your credentials safe and consider changing the default port 3389 for added security, and you’re all set for efficient remote administration.
How to Connect to Your Windows VPS After Enabling RDP
So, now you have successfully enabled your remote desktop server on your Windows VPS. Now we come to another interesting part: actually connecting to it. It depends on which device you will be using, because the process changes slightly for each device, but it’s still very simple to understand.
You have Windows, Mac, Android, or iOS; we have got everything covered for you here.
We will now start to connect you to your server and get you working instantly.
1. From Windows via Remote Desktop Connection
Connecting from a Windows computer is the easiest because your remote desktop is already built into Windows, so you don’t need to download anything extra. Here are the simple steps.
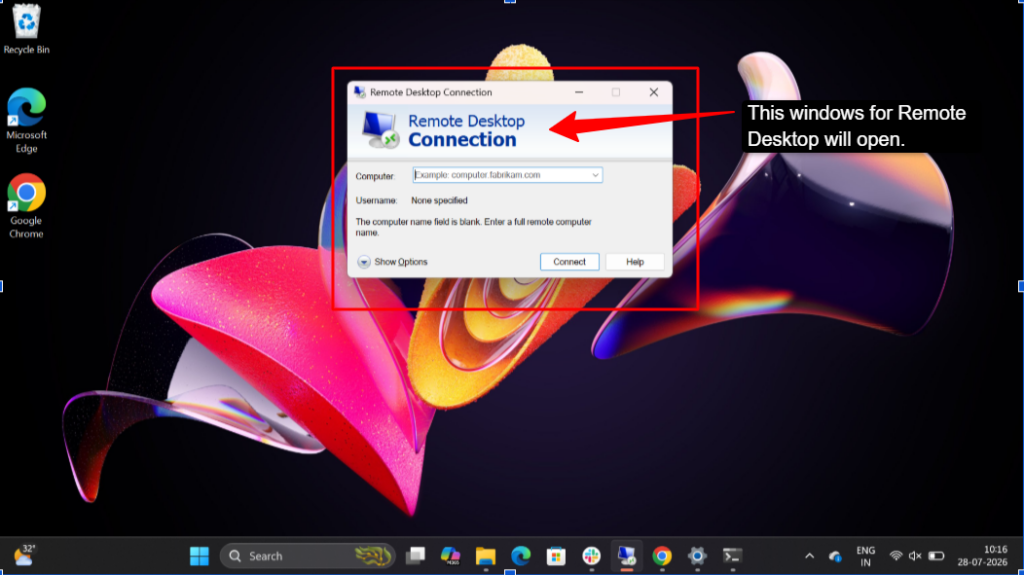
Step 1: Open your remote desktop connection.
- Press the Windows key + R to open the Run dialogue.
- Type “mtsc” and press Enter.
- The Remote Desktop Connection window will open.
- Alternatively, search for “Remote Desktop Connection” in your start menu and click it.
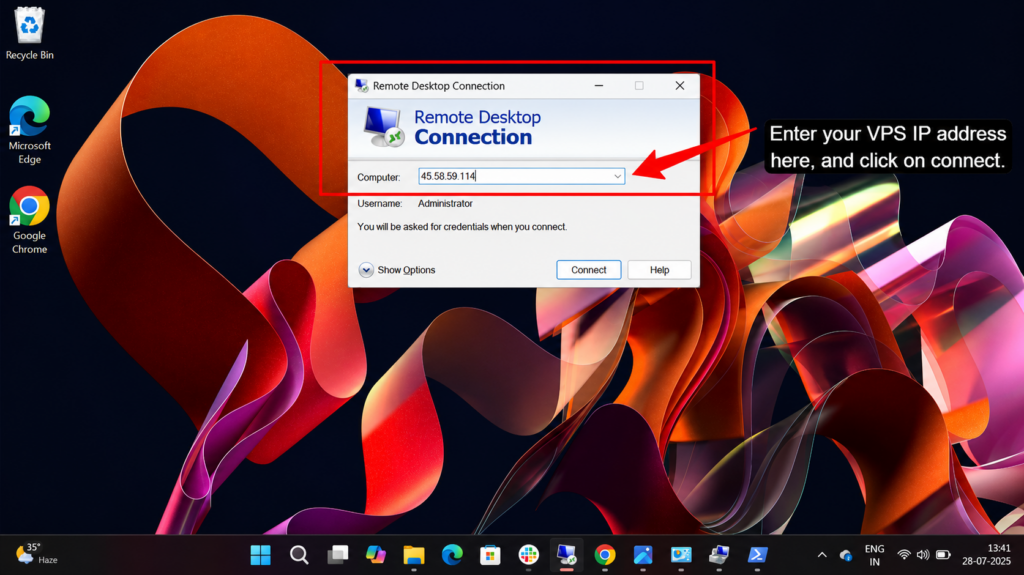
Step 2: Enter your VPS details.
- In the computer field, type either your VPS IP address (like 192.168.1.100) or your computer name (like SERVER-12345).
- Leave the “User Name” field blank for now (you’ll enter it at the login screen)
- Click Connect.
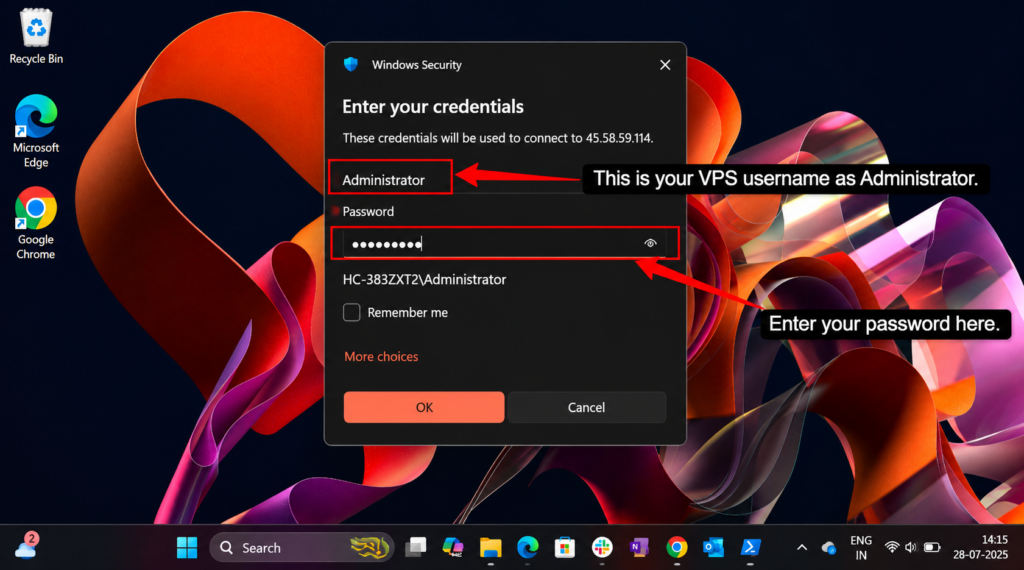
Step 3: Enter your login credentials.
- A login screen will appear, asking for a username and password.
- Type your administrator username (usually “Administrator” or whatever you set it as)
- Enter your admin password.
- Click “OK” or press Enter.
Note
We wanted to take you through the exact steps so you don’t make any mistakes, so we have chosen our provider, QloudRDP, to show you how you can connect to your Windows VPS.
Step 4: Accept the certificate (first time only)
- On your first connection, Windows will ask if you trust the certificate.
- A dialogue will say, “The identity of the remote computer cannot be verified.”
- Click Yes to proceed (this is normal for a first-time connection).
- Your VPS desktop will now load.
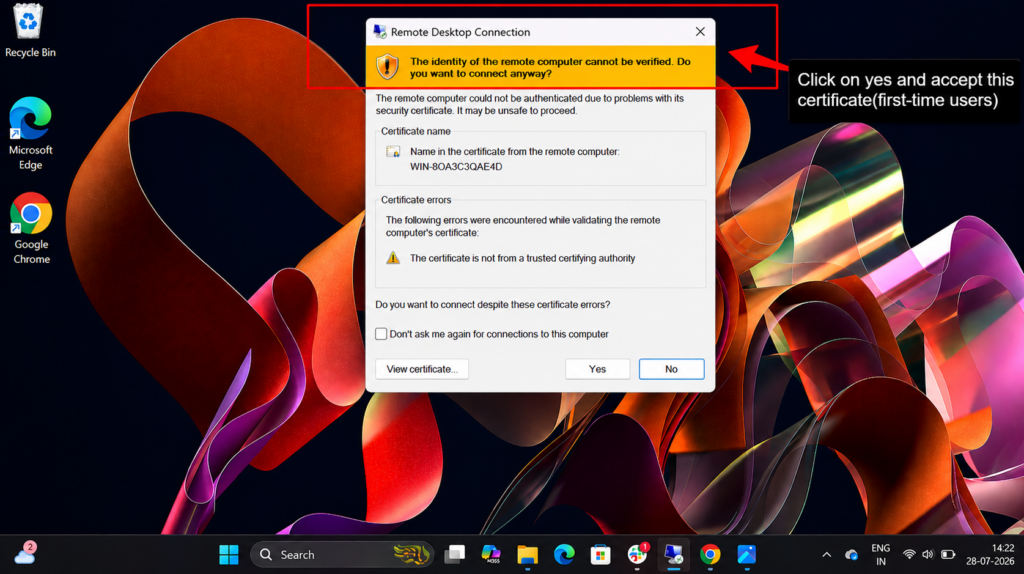
Once you click on “Yes,” you accept the certificate. This only happens to first-time users. After this, you can access your remote desktop instantly.
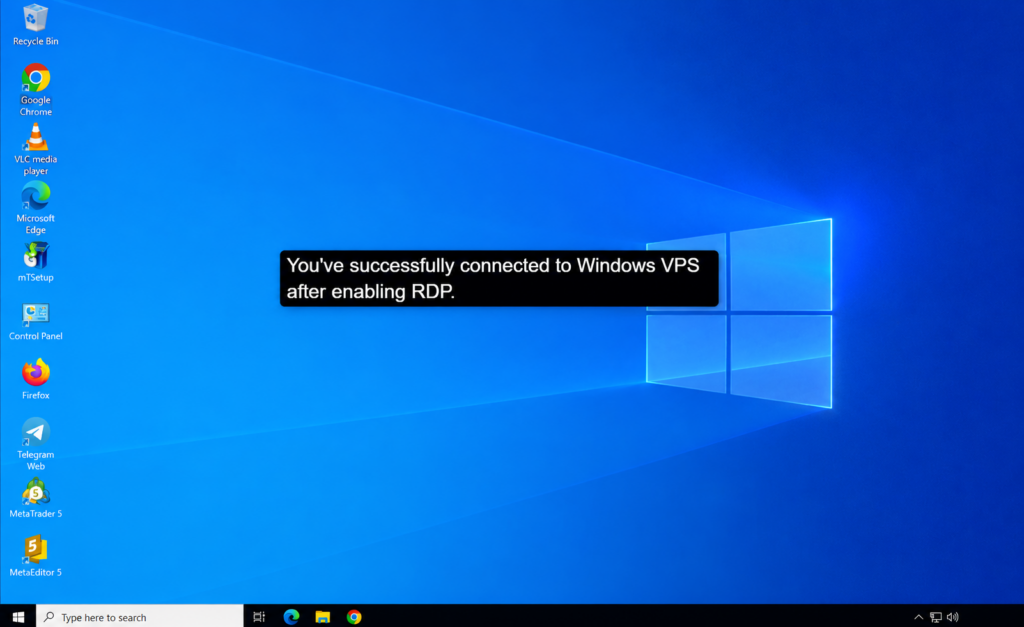
This is your Windows VPS, now ready to be used. Now, from here you can do anything you want as per your specific needs.
Optional settings Before Connecting
- Click “Show Options” before clicking Connect to access more settings.
- Under the “Display” tab, you can change the resolution (smaller resolution means you get a faster connection).
- Under the “Local Resources) tab, you can share your local printer or clipboard with the VPS.
- Under the “Experience” tab, you can reduce visual effects for faster performance if you experience slow connections.
Windows Connection Tips
Save your connection settings by entering your details, then clicking “Save As” before connecting. Next time, just load the saved file. If you changed the RDP port from 3389 to something else, type the IP like this: 192.168.1.100:5555 (where 5555 is your custom port)If the connection fails, check that port 3389 is open in your firewall settings on both your local machine and your hosting provider.
Now, let’s understand the same way you can connect if you are a Mac, Android, or iOS user.
2. From Mac, Android & iOS
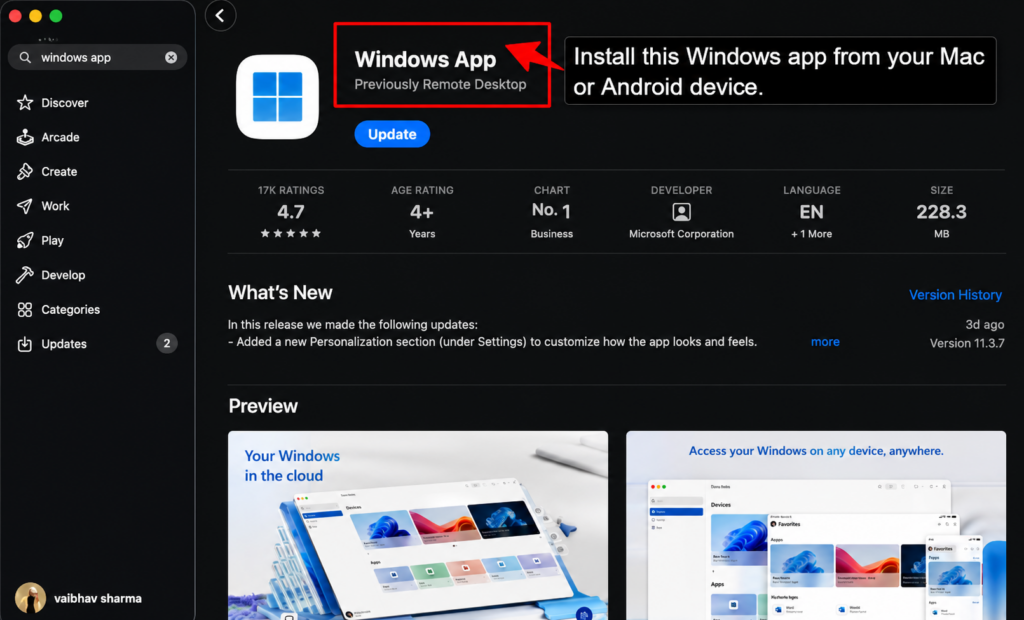
If you’re using a Mac or mobile device, you’ll need to download the Windows app and easily connect to Windows from your Mac. It comes totally free and will work great for you.
- Step 1: Download Windows App
- Open the App Store on your Mac >> Search for “Windows App.”
- Click “Get” and then install.
- Once installed, you’ll find it in your Applications folder or Launchpad.
- Step 2: Launch and Add a connection
- Open Microsoft Remote Desktop >> Click on the add button >> A new connection window will open.
- Enter your VPS details.
- In the “PC name” field >> Enter your VPS IP address or computer name.
- In the “Username” field >> Enter your administrator username >> Click “Save.”
- Step 3: Connect to your VPS
- Enter your admin password when prompted >> Click Continue >> Accept the certificate warning on first connection. >> Your VPS desktop will appear on your Mac.
And that’s it.
You now have full access to your Windows VPS remotely from Windows, Mac, Android, or iOS. You can work from anywhere: your home, office, or any place you desire to work from. Easily control your server just like you’re sitting right in front of it.
If your connection drops, just reconnect using the same steps.
Most of the connection problems are simply firewall or port issues, so make sure port 3389 is open on both your local machine and your hosting provider.
How to Add or Allow Users for RDP Access
By default, only the administrator accounts can connect to your Windows VPS through RDP. But what if other people on your team need access too?
Adding users for RDP access is simple and easy and takes only a few minutes. You don’t need to share your admin password with everyone; instead, you can create separate user accounts and give them RDP permission.
There are three easier methods with which you can do this. Let’s see now.
Method 1: Add Users Through Settings (Easiest Way)
This is the simplest method, and it has zero number of commands; you just need to click.
- Step 1: Right-click on “This PC” >> Click on “Properties.”
- Step 2: Find your remote settings >> Click it >> Look for “Select Users.”
- Step 3: Click on it >> A box appears showing current RDP users >> Click on the “Add” button.
- Step 4: Type the username of the person you want to add >> Click “Check Names” >> Click ok.
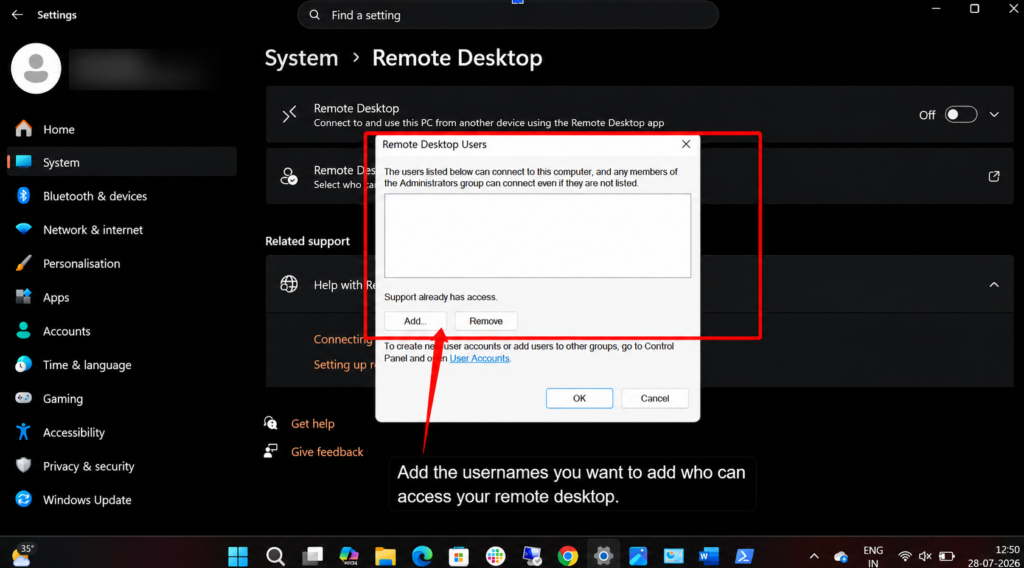
Now it’s done. The user is now added and can use your remote desktop easily.
Method 2: Add Users Through Computer Management (GUI)
This method gives you a better view of all your RDP users.
- Step 1: Open Computer Management >> Press Windows key + X on your keyboard >> Click on Computer Management.
- Step 2: Find your “Remote Desktop Users” >> On the left-side menu >> Click “Local users and groups” >> Then click “Groups” >> Find “Remote Desktop Users” in the list.
- Step 3: Double-click “Remote Desktop Users” >> A window opens showing who RDP access has>> Click “Add.”
- Step 4: Type the username >> Check names >> and click Ok.
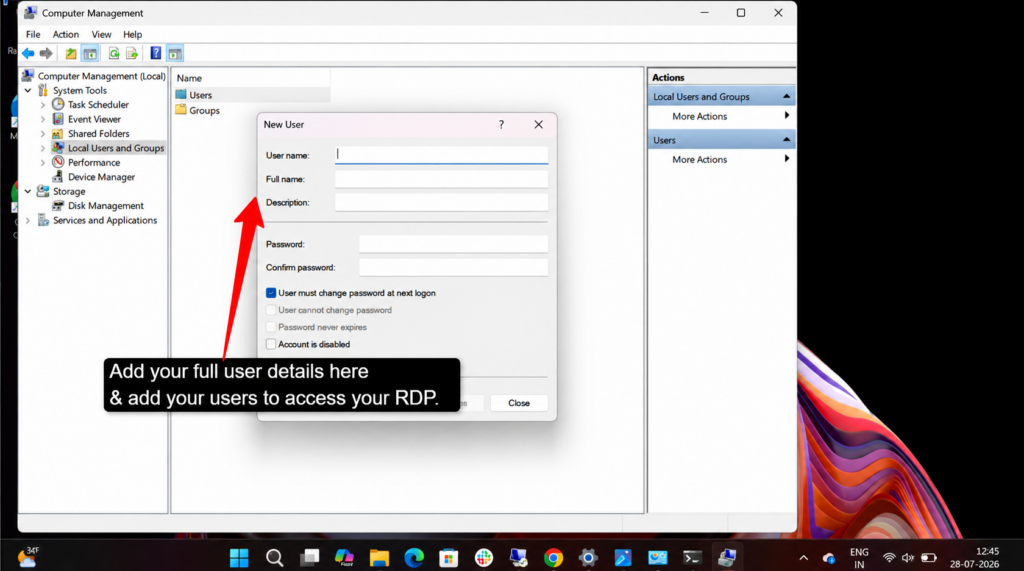
Close everything, and then click the “OK” button to close the windows. Your users can now connect through RDP.
Method 3: Add Users Using PowerShell (Fastest)
If you are comfortable with typing commands, this could be the quickest way for you. Just for your convenience, I have added all the commands, so you can simply copy and paste them on our PowerShell terminal.
Command
New-LocalUser -Name "test" -Password (ConvertTo-SecureString "test123" -AsPlainText -Force) -FullName "Test User" -Description "RDP User"
Add-LocalGroupMember -Group "Remote Desktop Users" -Member "test"- Step 1: Open PowerShell >> Right-click on it >> Click “Run as Administrator” >> A black command window will open.
- Step 2: Command
New-LocalUser -Name "test" -Password (ConvertTo-SecureString "test123" -AsPlainText -Force) -FullName "Test User" -Description "RDP User"
Add-LocalGroupMember -Group "Remote Desktop Users" -Member "test"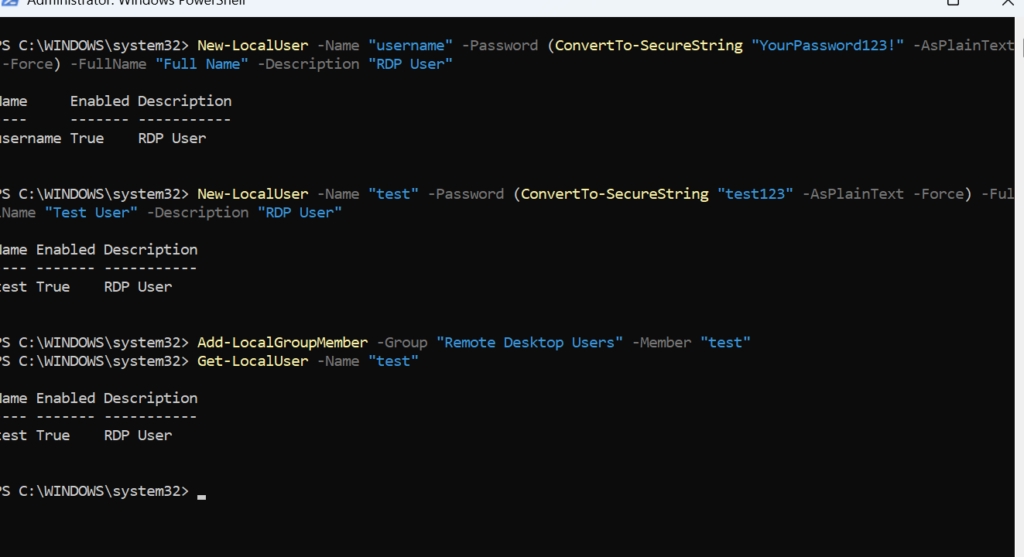
- Step 3: Replace “username” with the actual name of your member >> Press Enter.
Your user is added now. If there is no error message, your user is successfully added. They can easily connect through RDP immediately.
Simple Security Tips
Always use strong passwords. Only add who needs it. Keep track of your users.
That’s it. You know how to add users for your RDP access. Choose whichever method feels easiest for you. Once you add any user, they can immediately connect with their own username and password. They won’t need your admin password, and your server stays secure.
Remember to give your RDP access to people who really need it, because it’s the best way to keep your Windows VPS safe.
Common Errors When Enabling RDP & How to Fix Them
Even after you enable RDP correctly, you might still run into problems. So don’t worry; this happens to everyone, but most of the RDP errors are easy to fix once you know what to look for.
In this section, we’ll tell you the most common errors people face trying to connect to their Windows VPS through RDP, and we’ll show you exactly how to fix each one.
Error 1: “Remote Desktop Can’t Connect to the Remote Computer”
The connection attempt failed due to the unreachable remote computer. The firewall on the hosting provider is blocking port 3389, or the remote firewall is not accepting RDP connections.
Fix: Log into your hosting provider’s dashboard.
- Check if port 3389 is open in the firewall.
- Save and wait 2 minutes for it to take effect, then try connecting again.
Error 2: RDP Port 3389 Blocked or Not Listening
RDP service is not running or is disabled on the remote machine. Port 3389 is not actively listening for incoming connection requests from the client.
Fix: Enable RDP services
- Press Win + R >> type services. msc >> Enter.
- Find “RDP,” right-click, and start.
- Properties >> Startup type: Automatic.
Error 3: Firewall or Network-Level Authentication (NLA) Issues
Windows Firewall is blocking inbound RDP traffic, or the NLA (Network-Level Authentication) security protocol is not allowing the connection. Remote Desktop rules not added to firewall exceptions.
Fix: Press Win + R >> type firewall.cpl >> Enter.
- Click Allow an app through firewall.
- Check for Remote Desktop (both Private & Public).
- Click OK.
Error 4: Credentials Not Working
Caps Lock is engaged, causing password case mismatch or incorrect username/password entered. For domain accounts, ensure the domain prefix is included (domain username).
Fix: Make sure your capslock is off.
- Double-check your password character by character.
- For local accounts, use just “Administrator” (no domain prefix)
- If you forgot the password, use your hosting provider’s console to reset it.
- Try connecting again with the correct credentials.
Now restart your VPS and try connecting again.
These four are the most common errors that cover 90% of your RDP problems. If you follow these quick fixes, you’ll get connected easily. Most of the issues are simply a closed port, the wrong password, or the service not running.
Try the fix that matches your error, and you will be good to go.
Conclusion: Your Windows VPS Is Ready for Remote Access
You now have everything you need to enable RDP on your Windows VPS and start connecting remotely.
We’ve clarified everything simply: what you need before starting, how to enable RDP on a Windows VPS using different methods, and how to fix the most common errors.
It’s not at all complicated, and most people can get up and running in less than 15 minutes. Just pick whichever method works best for you: GUI, Settings, or enabling RDP via PowerShell. They all get the job done. Now just remember your VPS IP address, open Remote Desktop, and connect.
Follow one of the methods above right now and have your RDP running in minutes
Don’t wait; enable RDP on your Windows VPS today.
Your Next Read Starts Here
- Why Is My RDP Slow? 10 Proven Fixes to Stop Lag (2026)
- Best RDP with UPI Payment in India (2026): Instant, No Card Needed
- Buy Anonymous RDP with Crypto – No KYC & Instant Setup
- How QloudRDP Ensures Reliability at an Affordable Price?
Frequently Asked Questions
Is RDP enabled by default on a Windows VPS?
No, RDP is not enabled by default on most Windows VPS instances. Your hosting provider installs Windows but doesn’t enable RDP for security reasons. You have to enable yourself using several methods.
How do I find my Windows VPS IP address?
Log in to your hosting provider’s dashboard (AWS, Azure, etc.) and look at your VPS details. The IP address is usually displayed right there. If you can’t find it, use your provider’s console to log in, open your command prompt, and look for the IPv4 address.
Can I enable RDP without admin access?
No, you cannot. You absolutely need administrator access to enable RDP. If you don’t have admin access, you can’t change system settings, open firewall ports, or start your services.
Which Windows Server versions support RDP?
RDP supports Windows Server versions 2012, 2016, 2019, 2022, and 2025.
Why can’t I connect after enabling RDP?
You need to check these in order:
- Port 3389 is open in your hosting provider’s firewall.
- Your username and password are correct.
- Remote Desktop Services is running.
- You’re using the correct IP address.
Is it safe to keep RDP port 3389 open?
No, it’s risky to leave your port 3389 open because hackers automatically scan for it. Instead, change the port to something random, like 5555, use a strong password, and enable network-level authentication.









4 Comments